Burrito Roll
The last seam in a Parafoil or Flowform or other soft kite with a profile is often called the 'Burrito Roll'. It is because the entire kite is rolled up inside itself, bad side out, so that the final seam can be sewn and the edges of the seam are inside the left-most (starboard) cell.
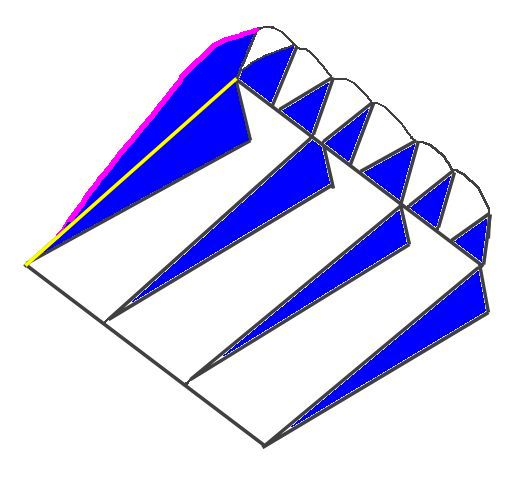
In the picture below, the yellow line is last seam sewn. The first (pink) seam is just above it. The first seam is sewing the outside starboard Rib to the Top Panel. The reason for this is that sewing the top edge of the Ribs involves sewing a curved edge to a straight line. That is hard enough to accomplish without fighting with extra layers or lots of fabric. So, the first seam is top left.
It should be mentioned before we go much farther that it makes life much easier if all the parts are labeled. Painters masking tape makes great labels. In the picture below you will notice that the Keel labels are pointed. This is because it is very easy to hem the wrong two edges of the Keel. Almost half the people in the workshop for this kite hemmed at least one of their Keels the wrong way. So I use pointed Keel label and put them in the point of the Keel where the hems meet, where the Bridle will be attached.

It should also be mentioned that I number parts in order of use. That means that Top 1 is on the left of our picture at the beginning of this post, and Bot 1 is on the right.
The picture below demonstrates sewing a curved Rib to the Top Panel. This is one of the internal Ribs. When making this model of kite, every Rib gets a new Panel, so the sewing is always merely matching the edges for the seam.

In the picture above, the edge of the Rib and the edge of the white Panel are towards the camera. The seam begins to be sewn at the Hem(s) on the left. When placed in the sewing machine, fabric to the left, edges to the right, the Rib will be underneath the Panel(s). Don't worry. It is not as hard to sew as it looks.
It should also be mentioned that in the pic above, there are 3 layers of fabric, 3 separate parts, that make up the seam. The sandwich layers are: On the bottom, a Top Panel, good side up. Next, another Top Panel, bad side up. Last, the Rib, aligned the only way it will fit. When I hem the Ribs, I make half the hems in one direction, and half in the other. The Ribs are labeled and numbered 1 thru 7. Number 1 is the first Rib sewn to the kite. Number 7 is the last Rib sewn to the kite.
When I make the next one of these... Seriously, I love the way this kite flys. I need one in Club colors. Anyway, when I make the next one, I promise to have this Blog in mind and take more pictures. Meanwhile...
We sew across the Top of the kite, sewing Rib to Top(s), seven times. Then the next seam is the bottom right seam. The parts of the kite involved are the port outside Rib (#7) , port outside Keel, and a Bottom Panel.
And that is the sandwich. We lay the kite out with the port outside Rib (#7) good side up. Next, place a Keel, with the bad side (hems) up. Last. place a Bottom Panel on top of the Rib, bad (hem) side up.
You will notice that it is much easier to sew these STRAIGHT lines. :)
The next seam is Rib 6 to two Bottom Panels. Rib 6 is the next Rib that is sewn to the Top. Don't skip any Ribs! With the Leading Edge of the kite to the right of the work space, (1) a new, free, not sewn to anything yet, Bottom Panel 2, good side up, hems down. (2) Bottom Panel 1, which is already sewn to the kite, bad side up. (3) Rib 6, the only way it will go.
By now you can do it in your sleep. :)
But the next seam is Rib 5. This seam will get your attention! There are FOUR layers. The parts involved are: Rib 5, Bottom Panel 2, Keel 2, and Bottom Panel 3.
Okay, this post needs to be fleshed out a bit more. But, for now, the suspense is killing you. How is the last seam sewn, INSIDE the kite?
It is much easier than it seems, but it is hard for some people to wrap their heads around. So, this is what it looks like:
In the picture below, the yellow line is last seam sewn. The first (pink) seam is just above it. The first seam is sewing the outside starboard Rib to the Top Panel. The reason for this is that sewing the top edge of the Ribs involves sewing a curved edge to a straight line. That is hard enough to accomplish without fighting with extra layers or lots of fabric. So, the first seam is top left.

It should be mentioned before we go much farther that it makes life much easier if all the parts are labeled. Painters masking tape makes great labels. In the picture below you will notice that the Keel labels are pointed. This is because it is very easy to hem the wrong two edges of the Keel. Almost half the people in the workshop for this kite hemmed at least one of their Keels the wrong way. So I use pointed Keel label and put them in the point of the Keel where the hems meet, where the Bridle will be attached.

It should also be mentioned that I number parts in order of use. That means that Top 1 is on the left of our picture at the beginning of this post, and Bot 1 is on the right.
The picture below demonstrates sewing a curved Rib to the Top Panel. This is one of the internal Ribs. When making this model of kite, every Rib gets a new Panel, so the sewing is always merely matching the edges for the seam.

It should also be mentioned that in the pic above, there are 3 layers of fabric, 3 separate parts, that make up the seam. The sandwich layers are: On the bottom, a Top Panel, good side up. Next, another Top Panel, bad side up. Last, the Rib, aligned the only way it will fit. When I hem the Ribs, I make half the hems in one direction, and half in the other. The Ribs are labeled and numbered 1 thru 7. Number 1 is the first Rib sewn to the kite. Number 7 is the last Rib sewn to the kite.
When I make the next one of these... Seriously, I love the way this kite flys. I need one in Club colors. Anyway, when I make the next one, I promise to have this Blog in mind and take more pictures. Meanwhile...
We sew across the Top of the kite, sewing Rib to Top(s), seven times. Then the next seam is the bottom right seam. The parts of the kite involved are the port outside Rib (#7) , port outside Keel, and a Bottom Panel.
And that is the sandwich. We lay the kite out with the port outside Rib (#7) good side up. Next, place a Keel, with the bad side (hems) up. Last. place a Bottom Panel on top of the Rib, bad (hem) side up.
You will notice that it is much easier to sew these STRAIGHT lines. :)
The next seam is Rib 6 to two Bottom Panels. Rib 6 is the next Rib that is sewn to the Top. Don't skip any Ribs! With the Leading Edge of the kite to the right of the work space, (1) a new, free, not sewn to anything yet, Bottom Panel 2, good side up, hems down. (2) Bottom Panel 1, which is already sewn to the kite, bad side up. (3) Rib 6, the only way it will go.
By now you can do it in your sleep. :)
But the next seam is Rib 5. This seam will get your attention! There are FOUR layers. The parts involved are: Rib 5, Bottom Panel 2, Keel 2, and Bottom Panel 3.
Okay, this post needs to be fleshed out a bit more. But, for now, the suspense is killing you. How is the last seam sewn, INSIDE the kite?
It is much easier than it seems, but it is hard for some people to wrap their heads around. So, this is what it looks like:


Comments
Post a Comment